Pages

Monday, 1 October 2018

Making a Jack Skellington Resin display piece, and a Direwolf pendant piece from Game of Thrones

Making Resin Display pieces and a large pendant


 These resin pieces were my first attempt at using silicone as a barrier for resin.  I was dubious to begin with, but pleasantly surprised.


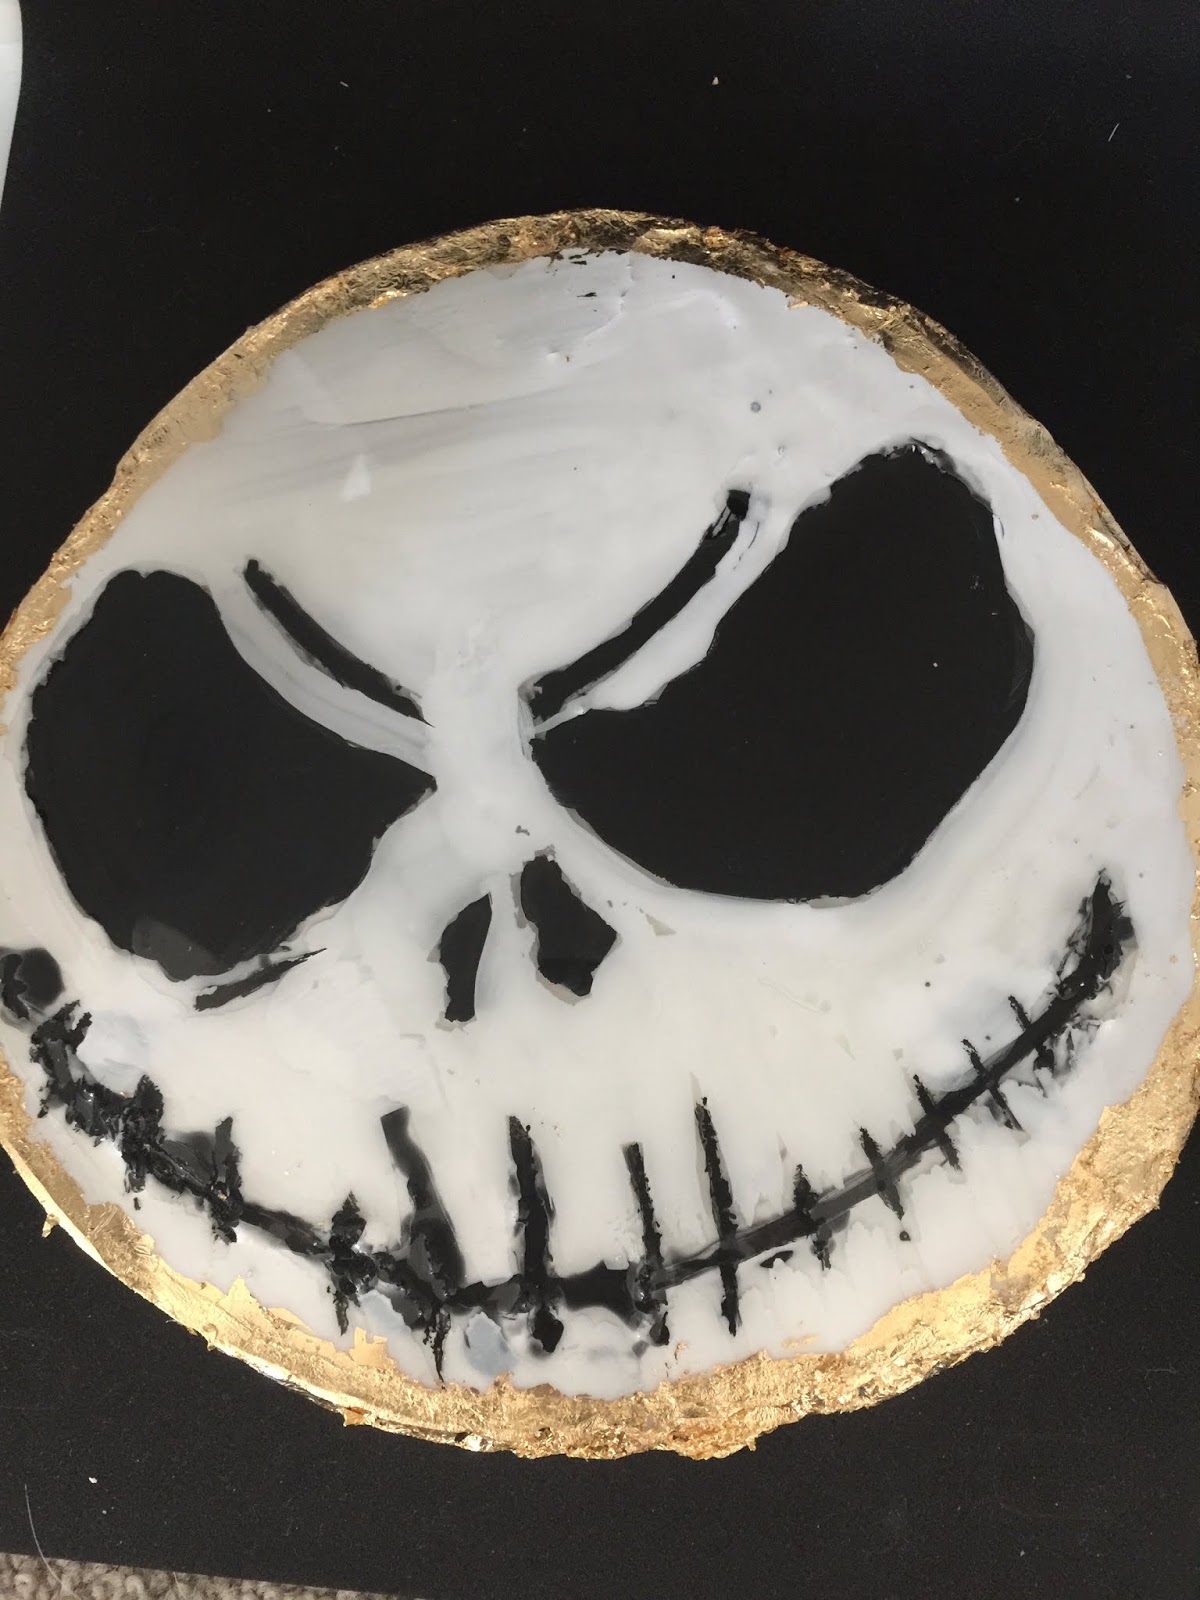
 I printed out the picture that I wanted.  I was thinking about my daughter and her University Graduation while doing this, and she absolutely adores The Nightmare Before Christmas.  So Jack Skellington it was.  I put baking paper on the top of the picture, for two reasons, one it is see through and two the resin should just peel off it and the silicone too.  It did, so yay!!😛


Look at me using a caulking gun, I think that is what it's called.  My son set it up for me lol 😉.  I bought the silicone tube from a cheap shop here, while paying for it the man behind the counter looked at me and said, do you have the gun that you need to use this with?  I looked stupidly at him and said, of course.  Hoping that my husband would have something in his shed of wonders.  He did, phew.
So I ran about three lines high of silicone around the outside of the face, and around the black parts of his face, so the eyes, the nose and the mouth.  I did this to stop the white resin from leaking in.  I let the silicone dry for a day.


I then made up and poured some white resin into the "mould".  Held my breath and kissed my pug for good luck lol. 


24 hours later he's looking a little rough.  I was concerned, but things take time and layers I am learning.  I let him dry for another day, removed all the silicone, you want the resin to be completely dry before removing the silicone.  I tried to take it out after a day and it was a little more difficult.  The next day it just peeled off, phew. 
I then made up and poured some black resin into the gaps for the eyes, mouth and nose.  Let it dry for at least a day.
 I thought about my next move, I put painters tape around the edge, poured a layer of clear resin and let it dry.  I did this to fill in the gaps that I had from improper silicone use.


Once it had dried for a couple of days, I sanded all the sharp edges off.  I then stared at it a little more, and decided I would use black acrylic paint to fill in any of the gaps I missed with the black resin.  Added some white acrylic paint to cover up some little spillages and voila!

Another very thing layer of clear resin, another day or two of drying.  Little more sanding on the edges and then I added the leafing size glue to the edges and a part of the top.  I wanted to add gold leaf to them.  I waited about an hour, placed the gold leaf where I wanted it and done.  Now I just need to find or make the perfect display stand.


I tried a different technique with the Starks Direwolf Pendant.  I printed out the Direwolf, put baking paper on top, made a barrier with silicone.  Let that dry for a day.  I then covered the whole piece with white resin, and then let that dry.

 I was going to use black resin to fill in the Direwolf, but I thought black acrylic paint would be nicer (easier).......It was lol.  A couple of black paint layers later and I added some clear resin.
It got a sanding on the edges too.  Then the same treatment for gold leaf.  I am adding a pendant holder to this one so it can be a necklace or maybe even a pin thingy that people wear on their clothes.
 GLAMOUR SHOTS


Here is the link for my Youtube Channel.......MY YOUTUBE CHANNEL!!

Please like, comment and subscribe!

Please follow me on facebook........... KristinaObrienart
I am also on Instagram.......... https://www.instagram.com/kristina_obrien_art/
Aaaand Pinterest....... https://www.pinterest.com.au/krystalrose316/pins/
And now on Etsy.........  https://www.etsy.com/au/shop/KrystalRoseCreations?ref=seller-platform-mcnav
And now Youtube.......https://www.youtube.com/channel/UCpgFuUdFo0dyREOhcSgXBrw

Until next time.........


Wednesday, 12 September 2018

Making Avengers shoes for less than $7, using gold leaf, paint and decoupage.


From boring and bland $3 Kmart Canvas shoes........


TO THE AVENGERS ONE OF A KIND CANVAS SHOES WITH GOLD LEAFING!!


All for less than $7!!!!

I bought some decoupage glue, stomped through Spotlights aisles looking for tissue paper, or any similar type of paper with a cool pattern.  Then I saw the party serviettes.  PERFECT!!


I saw these Avengers ones and immediately thought of my daughter, who loves Marvel and all those sorts of things.  I cut out the little bits and pieces of the serviette.  I left none uncut lol.  I cut out hands and patterns and faces.  There were 12 serviettes in the pack and I only used 3.  I have a great idea for the left overs, I will wrap the shoes in them.  Perfect wrap for a perfect gift.


Serviettes are two very flimsy pieces of paper lightly put together, you just pull the two pieces apart and the pattern is now on an even lighter piece of paper.  Perfect for decoupage.  I glued and glued and glued.  I was torn about either making the shoes minimalist or just go for it and cover the whole shoes with no particular pattern.  I decided on the latter, and I am glad!  Once the first layer was dry I put more pattern pieces and words on the blank bits of the shoes and covered them in glue again.  I even covered the lace holes, while the glue was wet I poked the holes back through them.


This is minimalist Avenger shoes.


And this is not......


I was going to glitter the bottom edges, but during a sleepless night I had the awesome idea to put gold leafing on the edges.  My daughter deserves the best hehe.


So I grabbed my Mont Marte leafing size glue and I began gluing it all over the bottom edges of the shoes.  Left if for an hour because the longer you leave it the stickier it gets.  I got my gold leaf and carefully placed it all over the glued areas.


I put the gold leaf on with my finger, pushing it down a little, then I brush with an old paint brush along the gold leaf to smooth it down even more, and to make the lumpy bits fall off.  Let it dry.


While the shoes were drying I started painting the shoe laces.

I used normal acrylic red and blue paint, and added about 50% of Chromacryl Textile Medium, it basically turns it into fabric paint.  Makes it not as stiff. 
I just used cheap craft paint that I bought for my boys to use.  I painted a few layers on both sides of the shoe laces and then hung them out to dry.


Once dry I put the laces in the dryer to heat set the Chromacryl additive.  Then I put the laces in the shoes and proceeded to take the GLAM SHOTS!!

I loved doing this and I love the way they turned out.


What's next I hear you ask????


SO MUCH IT NEVER ENDS!!!

I have uploaded my miniature polymer clay Jack o lanterns that glow video onto YouTube.  Here is the link,  https://www.youtube.com/channel/UCpgFuUdFo0dyREOhcSgXBrw      please like, comment and subscribe, I am determined to make my channel superb.  Next up on my blog and my YouTube is a Medussa Platter, Halloween inspired.  Miniature of course!


I am starting my dollhouse room box refurb tomorrow, and I will be posting that soon, too.

Here is the link for my Youtube Channel.......MY YOUTUBE CHANNEL!!

Please like, comment and subscribe!

Please follow me on facebook........... KristinaObrienart
I am also on Instagram.......... https://www.instagram.com/kristina_obrien_art/
Aaaand Pinterest....... https://www.pinterest.com.au/krystalrose316/pins/
And now on Etsy.........  https://www.etsy.com/au/shop/KrystalRoseCreations?ref=seller-platform-mcnav
And now Youtube.......https://www.youtube.com/channel/UCpgFuUdFo0dyREOhcSgXBrw

Until next time.........


Sunday, 9 September 2018

The making of a paper mache Dobby, from Harry Potter, and then painting him on to the canvas, AND my mini polymer clay jack o lantern!!


Not the most gorgeous face ever, but definitely one that I fell in love with.  Dobby, the elf from the Harry Potter series.  I actually came up with him because I was applying to be on a design team, whose main focus is adhesives.  An Australian company called Helmar.  I saw their design team call and knew that I wanted to be a part of the team.  It only just closed so at the time of typing this I have no idea if I am.  Maybe, maybe not.  At least I tried, and for that I am really happy.

I use adhesives in absolutely everything that I do, but they aren't the main focus, just an important element.  So I set myself a challenge to make glue the hero.  I think I did quite well.

I had a completely ruined Harry Potter book, so I ripped 😮 out some good pages that I could find, and I covered the whole canvas in glue.
I then added all the pages to the canvas, in a variety of directions.  Ensuring that the edges of the canvas were covered too.

Now came the hard bit.  Once it was dry I had to get the outline of Dobby onto the pages.  I used an 8b pencil and it did a great job.  To get the outline I found a picture online of Dobby that I liked, then I printed it out at the appropriate size for the canvas, and I traced it onto the canvas.


I then went over the edges in a raw umber outline, just to ensure that I didn't lose the lines while I was making the paper mache part.

Using glue I slowly layered up Dobby's nose and forehead, as they are the most prominent on him.  I ripped paper into small bits, glued them onto Dobby, making sure they didn't go over the outline.  I thoroughly covered each piece of paper in glue, before and after putting it onto the canvas.  I was honestly flying by the seat of my pants here.  I had no idea where I was going with this, and I was scared of how it was looking.  I persevered.  I am glad I did.


I kept building up his nose and his forehead, and then began to build up the tip of his ear and his lips.  I didn't want them too big, just enough to make the canvas seem lifelike.  I kept ripping and gluing until I was happy with the height.  The tip of the nose has to be higher and more rounded than the rest of the nose and forehead.


Kind of looking a little worrying at this stage, hehe.  I covered his face in unbleached titanium, and I wanted to make his lips and the end of his nose a little pink, so I added a speck of Alizarin Crimson to the unbleached titanium.


Ahhhh, beginning to look a little better, thank gosh.  I just kept building up the layers of unbleached titanium and the crimson at this point.  I wasn't worrying about the details of his wrinkles or lips.  I just wanted to get some paint on him to see how he was going to turn out.


I just kept my eye on the picture of Dobby that I printed and I worked from that.  His eyes are a mixture of sap green, light green and cadmium yellow.  His eyes seem to radiate in his pictures so I tried to capture that glow.  His whole face was differing mixtures of unbleached titanium, alizarin crimson and raw umber.  I then used Titanium White for the high lights and reflections.


I am really proud of how he turned out.  I loved the opportunity to dabble in mixed media.  Hopefully I continue to do more of these types of projects.


 The glue I used was Dina Wakley ultra thick gel medium.  I purchased this product a while ago from my favourite art shop here in Hervey Bay, Art & Soul Studio.  It was less than $12 and went a long way.
https://artandsoulstudio.com.au/

I am yet to varnish it, but when I do it will be Liquitex Gloss Varnish in a super large bottle that I love oh so much.  I am going to try the Super Glossy Varnish from Liquitex next.  I just love the finish it gives.


That is my glue inspired project I did on a whim.  Take a chance I say.  Follow your instincts, try it.  There's no real failures, just lessons learnt.


On to my next piece, a miniature polymer clay Jack o lantern that I put on top of a battery tea candle light.  I love it.  It took me a few attempts, as usual, to get it the way I like it and to figure out the best way to do it.

This is the next YouTube Tutorial, it will be up in a day or two.  The month of September is dedicated to Halloween!!  So bring on all the spooky and scary things.


So happy with the way the jack o lantern turned out.  I saw the battery tea lights and I thought yep, I need to do it.


Here is the link for my Youtube Channel.......MY YOUTUBE CHANNEL!!

Please like, comment and subscribe!

Please follow me on facebook........... KristinaObrienart
I am also on Instagram.......... https://www.instagram.com/kristina_obrien_art/
Aaaand Pinterest....... https://www.pinterest.com.au/krystalrose316/pins/
And now on Etsy.........  https://www.etsy.com/au/shop/KrystalRoseCreations?ref=seller-platform-mcnav
And now Youtube.......https://www.youtube.com/channel/UCpgFuUdFo0dyREOhcSgXBrw

Until next time.........


Monday, 3 September 2018

Refurbishing my old miniature doll house room box, tutorials soon on youtube. And previewing my miniature lamington and fairy bread polymer clay Youtube video that's coming!

Refurbishing my old dollhouse room box.

This is it.  This was lovingly made by my husband a few years ago when I was in the height of Anorexia.  There wasn't much brain power I had left to enable me to finish this room box, or start it for that matter.  My idea was the left side was to be a bakery with a walk through to a little coffee shop.  
Pink wall paper, hmmm, I know that has to go, and since I have newly acquired painting skills I am thinking the wall needs to be painted.  Should it still be a bakery?  Yes, I really want to do a bakery, with all the miniature polymer clay treats to display in the window.  Mmmm yummy.  The coffee shop I am not to sure of, I might change that into a store room for the bakery shop.  With shelves of all the ingredients and tools they use to make the yummy stuff.  Bags of flour, sprinkles, cream, mixers and whatever else floats my boat I guess.

I will be using the tiles I have made from resin and polymer clay to replace these bland ones I have put down.
Perhaps some green micro bead filled tiles?  I might make a special colour tile just for this.  Gold?  Rose gold?  I am not sure right at this moment in time.  I do know this, I will be videoing my progress and putting them up on my youtube channel.  I will be attempting to make everything from scratch, and that includes the cabinets, the window displays and the furniture.  I will be using a lot of glue, a lot of wood and paint and polymer clay.

I will also be displaying the uses of the products I make that are for sale in my Etsy shop, I think people need to see the product in use.  I will make mistakes, and I will show those mistakes.

This boring old brown room will become the storage room for the bakery.  Everything about this room will be changed.  I might even add some glow in the dark tiles, just for some fun!

I will get started on videoing my progress next week.  This week I have been focusing on getting my first ever Youtube video out there.

My First Youtube Video!!
Making miniature lamingtons and miniature fairy bread.
A sneak peak!!


Yep, those scrummy little cakes, covered in chocolate icing and rolled in coconut, what could be better?  Making them in miniature of course!!  And adding fairy bread to the mix.

In the video I explain the best way I have found to make lamingtons, and how to make the coconut and the sprinkles.  I show a few variations of making lamingtons and the fairy bread.


Lamingtons will be on display in my miniature bakery so I decided they would be a great first video, plus they are Australian!

Here is the link for my Youtube Channel.......MY YOUTUBE CHANNEL!!

Please like, comment and subscribe!

Please follow me on facebook........... KristinaObrienart
I am also on Instagram.......... https://www.instagram.com/kristina_obrien_art/
Aaaand Pinterest....... https://www.pinterest.com.au/krystalrose316/pins/
And now on Etsy.........  https://www.etsy.com/au/shop/KrystalRoseCreations?ref=seller-platform-mcnav
And now Youtube.......https://www.youtube.com/channel/UCpgFuUdFo0dyREOhcSgXBrw

Until next time.........