Pages

Showing posts with label resin art. Show all posts

Saturday, 13 July 2019

Making a red rose flower completely out of resin tutorial

How to make a red rose from resin tutorial.

This is the end product og an experimental technique I tried, mainly because I had a dream about it one night and it just wouldn't leave my head until I promised to try it.

If you want to see a timelapse tutorial of this process, I have put one on my YouTube channel here:
https://www.youtube.com/watch?v=dxCTKT7s3Io

Now I have an allergy to resin, so I had to get my confidence up and prepare myself for some itchy, red swollen days to come after using the resin.  I wore my gas mask, eye glasses, I lathered myself in barrier cream, used duct tape to hold my sleeves down to the gloves, and of course I wore gloves.  All of this preparation was not in vain, the only real place the resin fumes got to was my eyes.  The glasses were not full protective ones so I can't complain.  So while I am looking like Quasimodo and I do not particularly want to be seen I thought I would write up the blog.

I started with a hot glue gun and some cling wrap, I drew out the shapes I wanted the petals to be and I covered them in hot glue.  Hind sight being 20/20 I would do more larger petals next time.
The hot glue gun actually melted the cling wrap and made the whole process a lot easier.  Especially removal of the cling wrap.

So I prepared my resin, dressed like I was an invading alien (without the anal probe though), and I missed two colours up.  Pthalo green, which is very transparent, and I purposely didn't mix it thoroughly so it would be darker in some spots.  I used just a basic red for the petals, I am a little disappointed with the "fake" look it gives the final product so next time I will look at different reds and not mixing it so well. 
So I just pour the resin into the glue petals and I wait.  It is winter here so I had to wait about 8 hours until it became as hard as I needed it to be.  The leakage was my own slip up, none of the glue petals allowed for leakage, which was awesome.
So, when the resin is almost hard, not sticky at all, but still bendable, is the time to do the next step.  Bending the resin petals over what ever you have to curl them.  I used pencils and duct tape.


Next time I will curl more petals, I didn't this time because I wasn't too sure if it would work.  The next day, about 24 hours after pouring the resin I removed them from their molds.  They slipped out with no problem, even the cling wrap did not stick to it.  Awesome!!

I found a piece of wire that I wanted the rose attached to, and I glued the initial bud to it.
From there I picked the best two resin petals for the middle bud, using a fast drying glue I glued them together.  This part takes time, so use the best and quickest glue you can find.  You just work your way around the rose, gluing the petals and holding them.  I advise having a picture of a rose in front of you so you can see what it really looks like.  The mind likes to trick you lol.  Don't forget to glue the leaves to the wire stem, it is a little tricky but is definitely worth it.

Once all of the glue was dry I used some Krystal Kote gloss varnish from Helmar to spray the rose and add some extra glitter to it.

All in all I am happy with how it turned out.  I need more larger petals, a better red and a faster drying glue lol.


Hope everyone has a wonderful week, I know I will, my kids are back at school this week!!!


Please follow me on facebook........... KristinaObrienart

I am also on Instagram.......... https://www.instagram.com/kristina_obrien_art/

Aaaand Pinterest....... https://www.pinterest.com.au/krystalrose316/pins/

And now Youtube.......https://www.youtube.com/channel/UCpgFuUdFo0dyREOhcSgXBrw

I also have an Art with an Aussie Facebook group:  https://www.facebook.com/Art-with-an-Aussie-YouTube-Tutorials-2835141183194204/

Have a great week everyone.

Love

Me!  Kristina

Friday, 5 April 2019

Making an acrylic pour swipe diptych with lots of cells, using helmar PVA glue and silicone

Making an Acrylic Pour using Helmar PVA glue and Helmar Silicone Oil for Cells


Hey guys, Kristina here again with my very last post for Helmar.  I decided to do something I have wanted to try for ages, and that is an acrylic pour using PVA glue as the pouring medium, and silicone oil for the cells.  It actually worked better than I expected.  I covered the diptych in resin to enhance the shine once it was all dry, because I just love the gloss finish resin gives.

IMG_8677
Helmar products used:
Silicone Oil
Helmar craft and hobby pva glue

IMG_8681
Other Items required:
Paper Towel
Floetrol
Pouring medium or Airbrush medium
Water
Mixing Jug
Acrylic paints for pouring
Plastic cups
Popsicle sticks to mix the paints
Resin (if you decide to cover it in resin)

Procedure:
First of all there is a formula for making the pouring medium that you need to know.  This is the formula from "Pouring Your Heart Out" YouTube channel.  It is Floetrol 3 parts: PVA Glue 2 parts: Pouring medium 1 part: water 1/4 parts.  So, you use 300g of Floetrol, 200g Helmar pva glue, 100g of pouring medium and 25g of water.  You mix all of this together in a plastic jug and let is sit for a half hour.
Then decide on your paint colours, and the swipe colour.  Black or white is generally a great beginners swipe colour.  Add some of your pouring medium to the plastic cups, then add the acrylic paint to the pouring medium and mix well.  It is a great consistency when the paint stays on your popsicle stick when you lift it out of the mix, but it also flows straight back into the cup when you tip your stick.  If it is too thick, add more pouring medium or a little bit of water.  If it is too thin, add more paint.  I found Jo Sonja paints to be the best consistency for this type of pour.  Once you are happy with your mixes, leave them for at least an hour, this helps the bubbles settle to the bottom.

IMG_8560
The paint colours I used in this pour were:
Carbon Black (Swipe colour)
Titanium White
Yellow
Aqua
Burnt Sienna
Rich Gold
Pacific Blue
Metallic Copper
Yellow Ochre
IMG_8561
Once the paints have been mixed and left for a while, arrange your canvas that you will be pouring on.  Lay down a plastic covering on top of cardboard or plastic, so you don't make a mess on your floor.  Put your canvas on top of some cups, so it is not on the ground, otherwise it may get stuck to the ground.
IMG_8562

Right before you are going to do your pour, add the silicone to all the colours except the black (swipe colour).  Add approximately 4-5 drops in each cup, and stir once or twice, not too much.

Now it is time to pour.  Pour the paints in any order you want, but just make sure your swipe colour is in the middle of the canvas and a little at the top.

IMG_8563

Once you are happy with the paint, get your paper towel, I had to use two joined together because my canvas was wide.  Place the bottom of the paper towel into the black paint and drag it slowly down the canvas, making sure it is dragging the paint down the canvas,

IMG_8564

Then grab a new paper towel, place it in the black paint and swipe up the canvas in the same way you swiped down.  Almost immediately you will see the cells forming because of the silicone oil added.  It is absolutely beautiful to watch.

IMG_8566
This was the most fun I had had in a long time, just watching the colours mix and cells form.  If you have any spots on the canvas that are not covered in paint, just pour a little bit on them, or mix it around with a popsicle stick until you are happy.

IMG_8568

IMG_8568IMG_8568

Just leave the canvas on the flat surface until it is dry to touch.  It can take up to three days to be dry to the touch, depending on your weather etc.  Mine took two days, and even though it may look dry, refrain from touching it unless you are absolutely sure.  Yes, speaking from experience here, I touched it, it wasn't dry.  Once you are absolutely sure it is dry, give it a wipe with a slightly damp paper towel.  The silicone will rise to the top of the paint and make a slight film on the canvas.  Just wipe it off and it's done.

Next step is to wait about two weeks to ensure the paint is fully dry, and the pouring medium too.  This can take a while.  Then either varnish with your choice of varnish, or you can cover it in clear epoxy resin.  I chose resin, I have a pretty bad allergy to resin so I probably shouldn'y have, but I just love the gloss shine when it's dry.

Mix up your resin how the instructions tell you too, wear gloves, mask, fully cover up and do it in a well ventilated area.  I didn't do this when I first started with resin, and it caused me to become allergic.  I cannot even be touched by the fumes of the resin without getting a serious allergy burn with rash and severe itching.  It is not fun so I recommend always covering up.
You should always wear a mask, the fumes are pretty harsh, especially on your respiratory system.
IMG_8645

Lay your canvas flat and above the ground, like you did with the acrylic pour, and drizzle the resin over the canvas.  Help it smooth out and cover the canvas using a long flat stick or your hands with gloves on.
IMG_8646
Then when you are happy with the coverage you need to remove the bubbles using a heat gun.  Go gently over the whole canvas with the heat gun.  Then leave it alone to dry, it should be touch dry in about 12 hours, depending on weather.  This is what you should end up with, a gorgeous acrylic pour thanks to pva glue and silicone oil.

IMG_8678
IMG_8678
IMG_8678
IMG_8678

IMG_8678
IMG_8678
IMG_8678

43951369_710339359330536_8230164289923579904_nThank you for these awesome last six months, I have enjoyed using my creative side again.  It has been a pleasure and I hope everyone keeps creating with Helmar.  Don't forget you can purchase Helmar products from here:  http://www.helmar.com.au/shop/manufacturer/


Please follow me on facebook........... KristinaObrienart
I am also on Instagram.......... https://www.instagram.com/kristina_obrien_art/
Aaaand Pinterest....... https://www.pinterest.com.au/krystalrose316/pins/
And now Youtube.......https://www.youtube.com/channel/UCpgFuUdFo0dyREOhcSgXBrw


Monday, 1 October 2018

Making a Jack Skellington Resin display piece, and a Direwolf pendant piece from Game of Thrones

Making Resin Display pieces and a large pendant


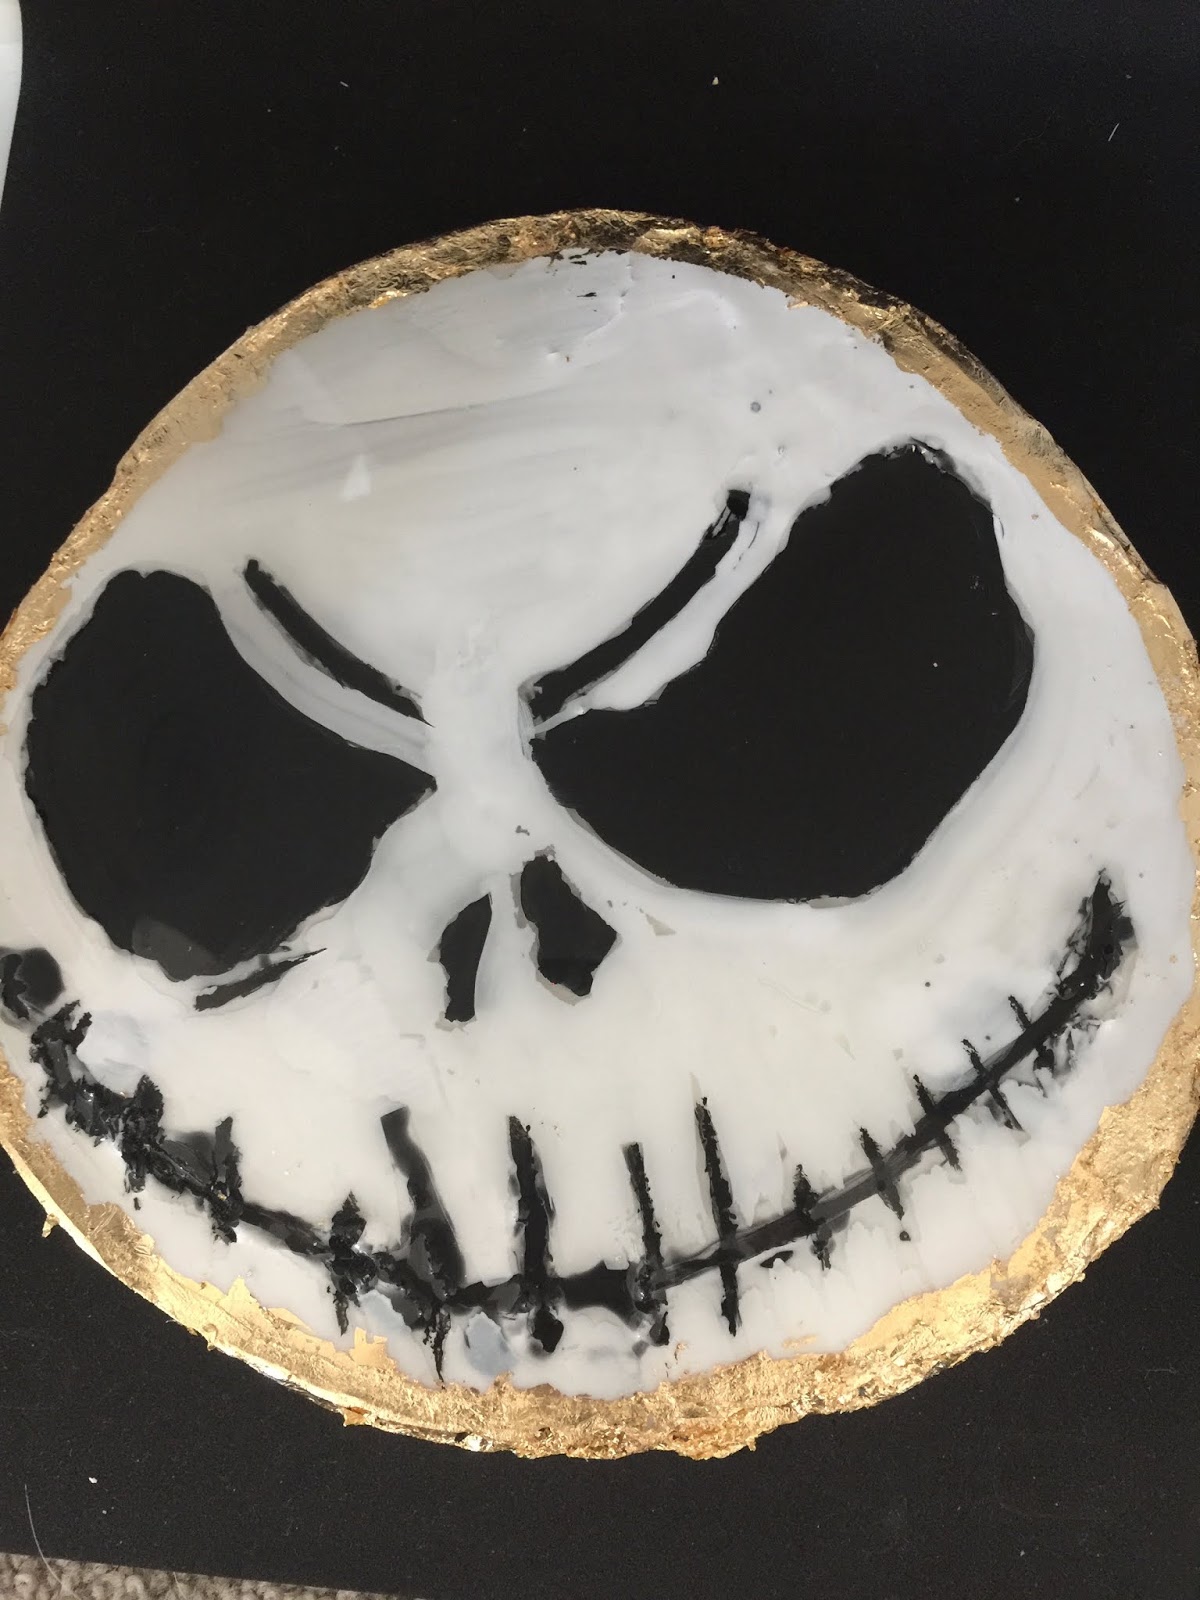
 These resin pieces were my first attempt at using silicone as a barrier for resin.  I was dubious to begin with, but pleasantly surprised.


 I printed out the picture that I wanted.  I was thinking about my daughter and her University Graduation while doing this, and she absolutely adores The Nightmare Before Christmas.  So Jack Skellington it was.  I put baking paper on the top of the picture, for two reasons, one it is see through and two the resin should just peel off it and the silicone too.  It did, so yay!!😛


Look at me using a caulking gun, I think that is what it's called.  My son set it up for me lol 😉.  I bought the silicone tube from a cheap shop here, while paying for it the man behind the counter looked at me and said, do you have the gun that you need to use this with?  I looked stupidly at him and said, of course.  Hoping that my husband would have something in his shed of wonders.  He did, phew.
So I ran about three lines high of silicone around the outside of the face, and around the black parts of his face, so the eyes, the nose and the mouth.  I did this to stop the white resin from leaking in.  I let the silicone dry for a day.


I then made up and poured some white resin into the "mould".  Held my breath and kissed my pug for good luck lol. 


24 hours later he's looking a little rough.  I was concerned, but things take time and layers I am learning.  I let him dry for another day, removed all the silicone, you want the resin to be completely dry before removing the silicone.  I tried to take it out after a day and it was a little more difficult.  The next day it just peeled off, phew. 
I then made up and poured some black resin into the gaps for the eyes, mouth and nose.  Let it dry for at least a day.
 I thought about my next move, I put painters tape around the edge, poured a layer of clear resin and let it dry.  I did this to fill in the gaps that I had from improper silicone use.


Once it had dried for a couple of days, I sanded all the sharp edges off.  I then stared at it a little more, and decided I would use black acrylic paint to fill in any of the gaps I missed with the black resin.  Added some white acrylic paint to cover up some little spillages and voila!

Another very thing layer of clear resin, another day or two of drying.  Little more sanding on the edges and then I added the leafing size glue to the edges and a part of the top.  I wanted to add gold leaf to them.  I waited about an hour, placed the gold leaf where I wanted it and done.  Now I just need to find or make the perfect display stand.


I tried a different technique with the Starks Direwolf Pendant.  I printed out the Direwolf, put baking paper on top, made a barrier with silicone.  Let that dry for a day.  I then covered the whole piece with white resin, and then let that dry.

 I was going to use black resin to fill in the Direwolf, but I thought black acrylic paint would be nicer (easier).......It was lol.  A couple of black paint layers later and I added some clear resin.
It got a sanding on the edges too.  Then the same treatment for gold leaf.  I am adding a pendant holder to this one so it can be a necklace or maybe even a pin thingy that people wear on their clothes.
 GLAMOUR SHOTS


Here is the link for my Youtube Channel.......MY YOUTUBE CHANNEL!!

Please like, comment and subscribe!

Please follow me on facebook........... KristinaObrienart
I am also on Instagram.......... https://www.instagram.com/kristina_obrien_art/
Aaaand Pinterest....... https://www.pinterest.com.au/krystalrose316/pins/
And now on Etsy.........  https://www.etsy.com/au/shop/KrystalRoseCreations?ref=seller-platform-mcnav
And now Youtube.......https://www.youtube.com/channel/UCpgFuUdFo0dyREOhcSgXBrw

Until next time.........


Saturday, 7 July 2018

Making my first Resin geode after I saw Mrs Colorberry


OMG Resin geodes!!!!!

About six weeks ago I was flicking through facebook when I saw a magnificent piece of art that I just wanted, I needed to create.  It was Mrs Colorberry, and I watched the timelapse of her making a geode over and over again and decided to try it myself because it was just too beautiful not to.

This is the end result of my attempt at a resin geode table.
I wasn't too sure about using MDF so I used plywood, I think it was 12mm thick.  I primed it ready to accept the resin.  If I didn't prime the wood it would just suck everything up like the Bermuda Triangle.  I use gesso now but for this one I used a paint and prime spray paint, white.

I googled for geode images that I really liked, the blue seemed to make me happy lol.  So I then drew out some lines which I wanted to the resin to follow, lol, resin to follow, lol.

I didn't cut a hole in the middle of the geode this time because I wasn't sure it would work, so I decided to use resin with black resin dye to pretend to be the hole in the middle.  I actually let this dry overnight so it wouldn't mix with the next colours, that pesky resin, always wanting to self level.

Then the next day I attempted to do the blue and white resin layers, using a heat gun to mix them together so they looked natural and pretty.  Remember, gloves, mask when using resin and a heat gun.  Even if the resin says it's ok the colours you are mixing in it may not be.  Better to be safe than sorry.  Also make sure the piece you are working on is level and in a safe and secure spot covered from wind and dust.

I have these awesome resin pigments from Solid solutions in Australia, they make the most beautiful colours ever!!!  solid solutions resin and dyes


This is my attempt at the middle and keeping the resin within the lines, hmmm, so far not too bad lol.  The rocks I placed around the area I wanted the resin to cover, they were some clear rocks.  
This is the next layer, though still technically the first layer, I used blue rocks, blue dye in the resin and white dye as well, and of course glitter.


I had the plywood sitting on my painting mason jars, yeah, don't do that, if there is resin dripping over the side it collects around the rim of the jars, and makes it super hard to remove when dry.


After the layers above had dried I then decided to do the black edge, which I didn't want mixing with anything.  I also had black sand that I put on the edges of the geode to make it seem more realistic and natural.

I wanted this geode to be the most beautiful thing I ever made, so I ensured that all the layers were dry before adding the next.  The next layers were resin and glitter, mmmmm glitter, so pretty.


Then I just placed some more gems and glitter in each of the layers, and then followed all of this with a few clear coat resin layers to make it smooth.

The base was made by my husband and son out of lightweight aluminum.   The end product is a layer filled, shiny glittery monster which I have fallen deeply in love with.

So shiny and glass like....mmmmmmmm


I love the iridescent glitter that makes it look green from one angle and blue from another.  I am super proud of this baby.


Moral of the story, don't burn yourself, follow the reference picture, don't put so much glitter on the final layer.  Do enjoy it, make layers and have fun.


Next up on the blog will be my Peter Stormare oil painting.  This is the painting that made me realise that I love to paint, and I want to get better.


Have a great week, an artists week.