Blue Fairy on a Pink Donut Fantasy Acrylic Painting Tutorial

Glamour Shots


Hey
there everyone, Kristina here with another blog post on acrylic
painting. I decided a fantasy painting would be perfect for this
month's tutorial. I really hope you enjoy painting this as much as I
did.
If you are in Hervey Bay, make sure you make time to visit Art and Soul Studio, shop 2/168 Boatharbour Drive, Pialba.
You can even shop online https://artandsoulstudio.com.au/.
Acrylic paints used in this tutorial:
These
colours and more are available at the Art and Soul Studio Hervey Bay. I
mainly use Golden paints and Liquitex heavy body. Jo Sonja has a
gorgeous rich gold that I use.
Mars Black
Rich Gold
Quinacridone Red
Brilliant Blue
Titanium White
Lavender
Primary Yellow
Primary Blue
Permanent Green Light
Dioxaxine Purple
Brilliant Magenta
Transparent Red Oxide
Burnt Sienna
Flesh Tint
Alizarine Crimson
Yellow Ochre
Burnt Umber
Paint Brushes Used:
Large Flat Brush
16/0 detailer brush
Size 4 Round brush
Dagger Striper
I used a 16 x 20 inch canvas board.
Gold Glitter for the fairy wings
Golden Super Gloss Varnish
Let's begin the fun!
First
step is usually to paint the back ground, this makes things a lot
easier and saves you a lot of time. So if you know what colour you want
the background to be then do it now. I wasn't sure what colour I
wanted until the very end. I chose Mars Black. So paint the whole
canvas Mars Black.
Wait for the paint to dry and sketch the shape of the donut onto the canvas. Then paint the whole donut Yellow Ochre.
Mix some quinadicridone red and titanium white to make the pink colour of the icing. This colour pink is perfect.

Paint over the sections marked for the icing with the pink paint. Use Mars Black to paint in the hole of the donut.
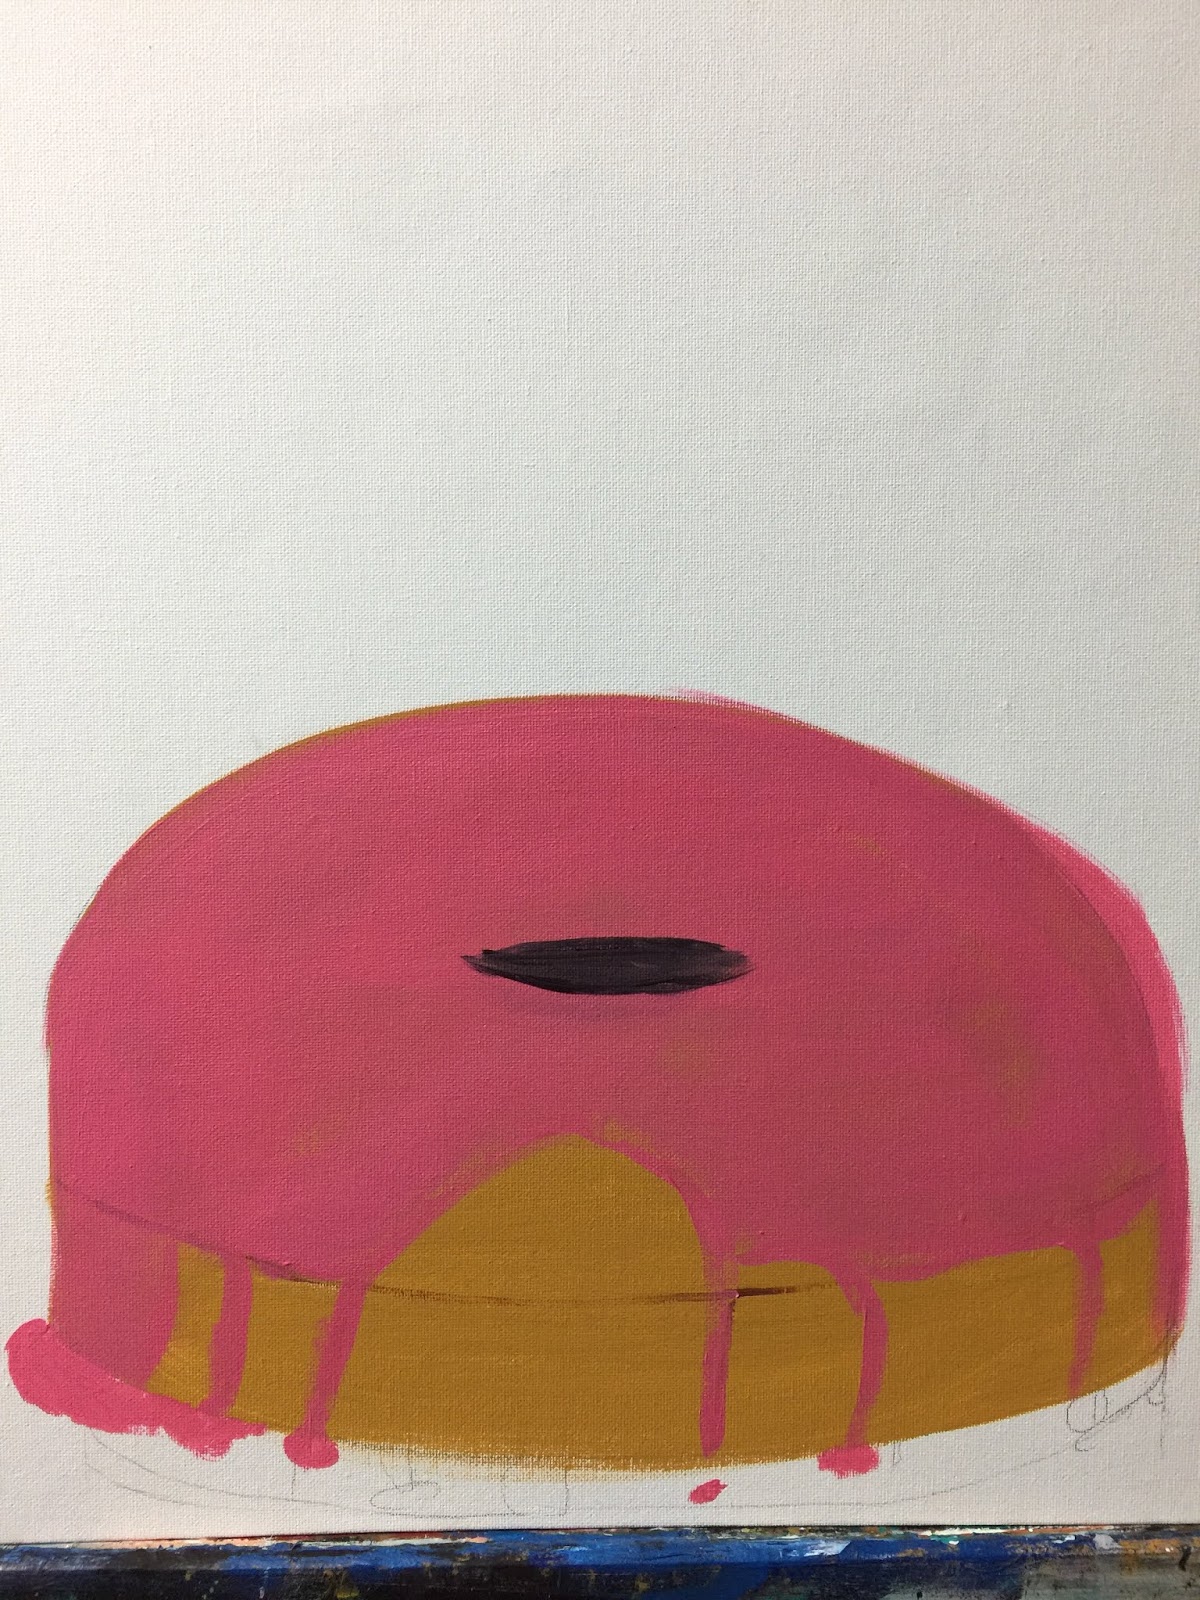
To make the texture of the dough, using a round brush just dab dots all over the yellow ochre part of the donut, using a combination of burnt sienna, yellow ochre and burnt umber mixed, burnt umber, yellow ochre and white mixed. Cover the whole area in lots of dots, keeping the bottom of the donut darker, and the parts directly under the icing darker as well.
Using burnt umber and the round brush, draw a curved line approximately half way down the donut, to form the crease. Add some titanium white to the burnt umber and draw a lighter line on the top and bottom of the burnt umber line to indicate highlights.


Painting the icing:
Adding shadows and highlights to the icing makes it look more realisitic, so let's get to it.
Using
a 3:1 ratio of Quin red and Titanium White, make a darker pink to begin
the shadows along the back edge of the donut. Use the flat brush to
curve your stroke up from the donut hole, in a curved motion forming a
backwards "C".

Now
for the darker highlights, just use Quin red, and a small amount of the
Green Light (being opposite on the colour wheel the green will darken
the red perfectly).

Shade
the donut as shown above, then using the round brush and the same
colour paint a line at the bottom edge of the pink icing and the edges
of the icing drips.
For the highlights use the quin red and titanium white mixture, adding more white to make it nice and light.
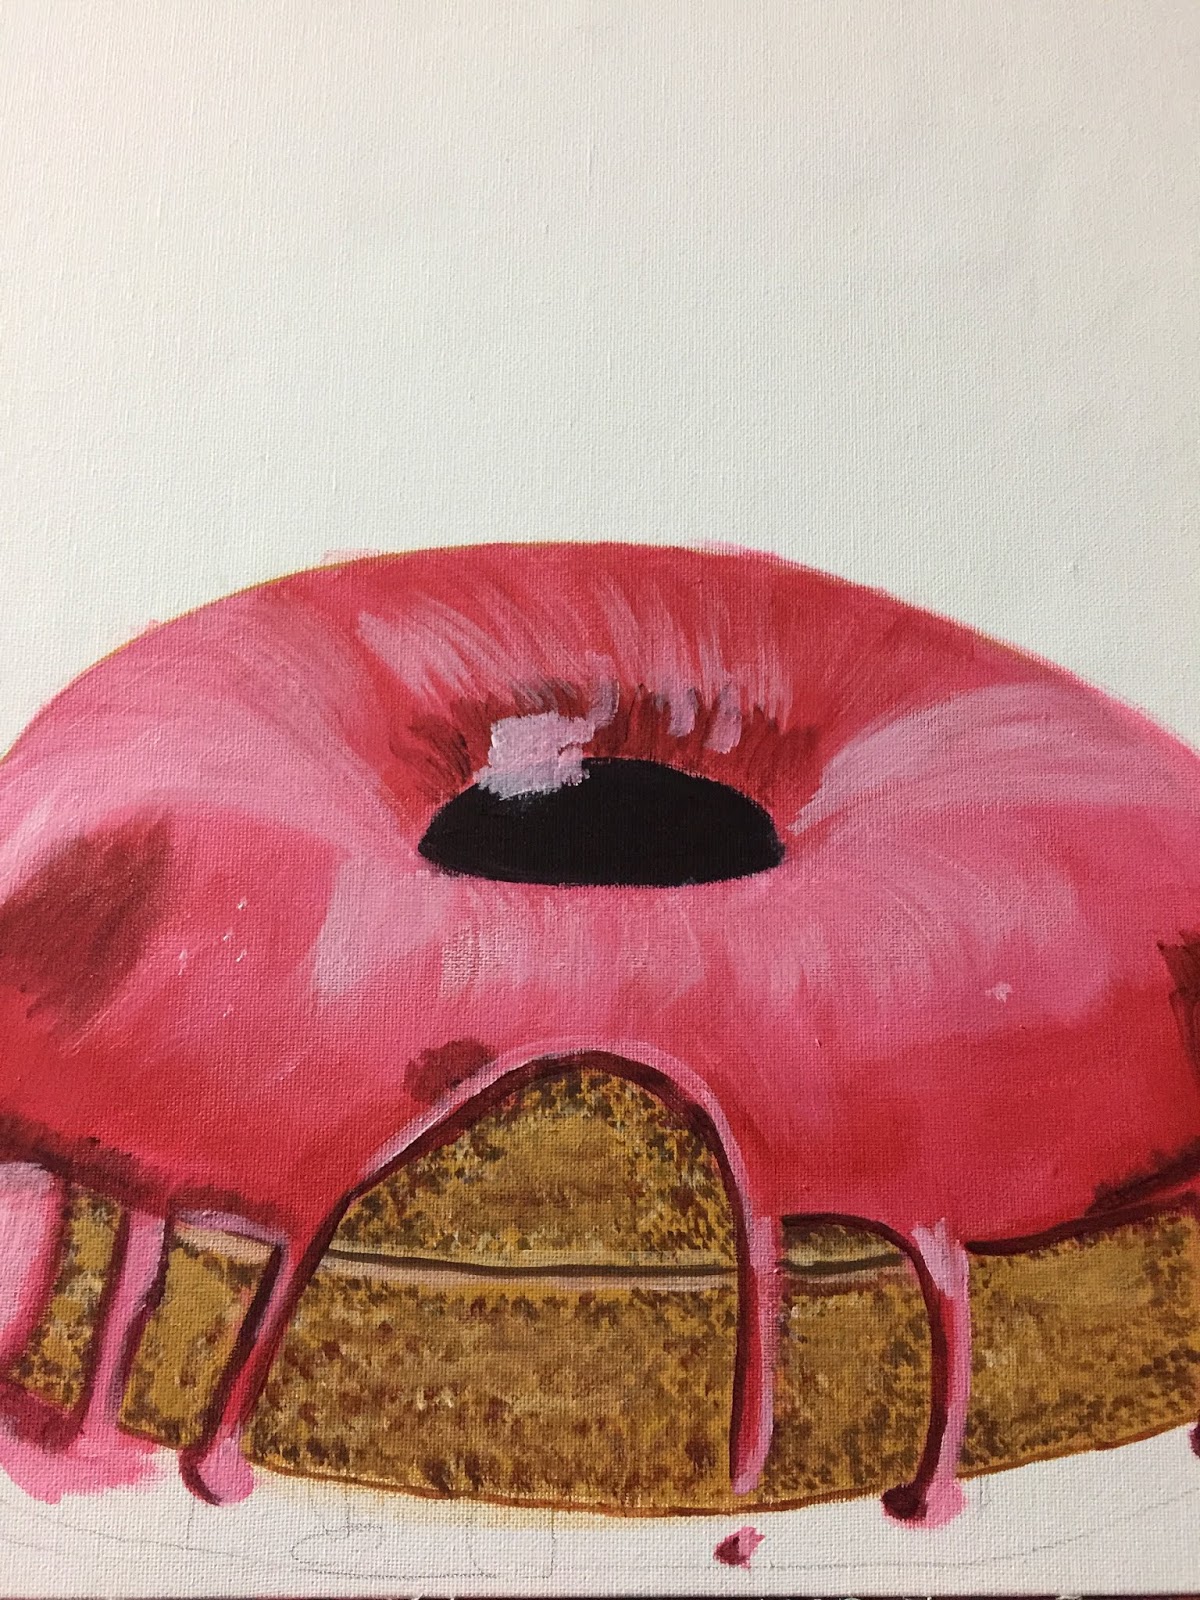
When
painting the top of the donut, make sure you do a curved motion to make
the top of the donut appear curved. Using the light mixture of the
pink and white, add the highlights as shown above. Making sure each
stroke is curved in the way you want the donut to look.
Add highlights to the icing drips as well.

Painting the sprinkles:
This
is quite easy, just get the colours for the sprinkles....Primary
yellow, titanium white, lavender, green light and quin red. Paint a
little line where ever you want the sprinkles, in all different
directions. To ensure nice coverage of the yellow, paint the lines
white first, then wait until it is dry and paint the yellow over the
top.
Add
darker colours to the bottom of each sprinkle for the shadow, and a
touch of white on the top for a highlight. This adds depth to the
sprinkles.

The donut should be looking like this, nice and edible.
Painting the fairy:

This
is the traceable for the fairy, this image was downloaded off Pixabay
and is free to use. Just don't draw in the mushroom as she is sitting
on the donut. Trace the fairy into position on the top of the donut. I
used pencil so you can see it. It is best to use chalk, watercolour
pencil or transfer paper.

Using flesh tint, do a first layer on all of her skin parts, head, chest, arms and legs.

Use the brilliant blue to paint in the fairy clothes.

Mix
transparent red oxide and yellow ochre 50/50 mix. Add a touch of
Alizarin Crimson and then mix titanium white into this mixture. You
should have a darker skin tone to paint in the creases and the shadows.
Use this darker mixture to paint in the lines on her chest, under her
neck, her collar bone and the outside of her legs and arms. Where all
the creases will be.

While the darker colour is still wet, use the flesh tone to blend the darker tone into the lighter tone.

The
face on this fairy is very simple. Using the darker flesh tone, paint
in the outlines of the mouth, eyes and the sides of the nose. See how
hinting at the lines on the face actually makes a face appear. It is a
very simple and easy face to paint. Paint in the hair using Primary
Blue, following the direction of the hair. High light the inner part of
her breast with a lighter flesh tone.

To
make the fairy a little naughty, by having bites taken out of the donut
is fun and quirky. Using yellow Ochre and the round brush dab along
where you want the missing piece.

Add some burnt umber and burnt sienna dabs to this bite too.

Dab
mars black around the edge of the bite, and then highlight this with
titanium white. Make sure the top half of the donut is darker, to hint
at the shadow.
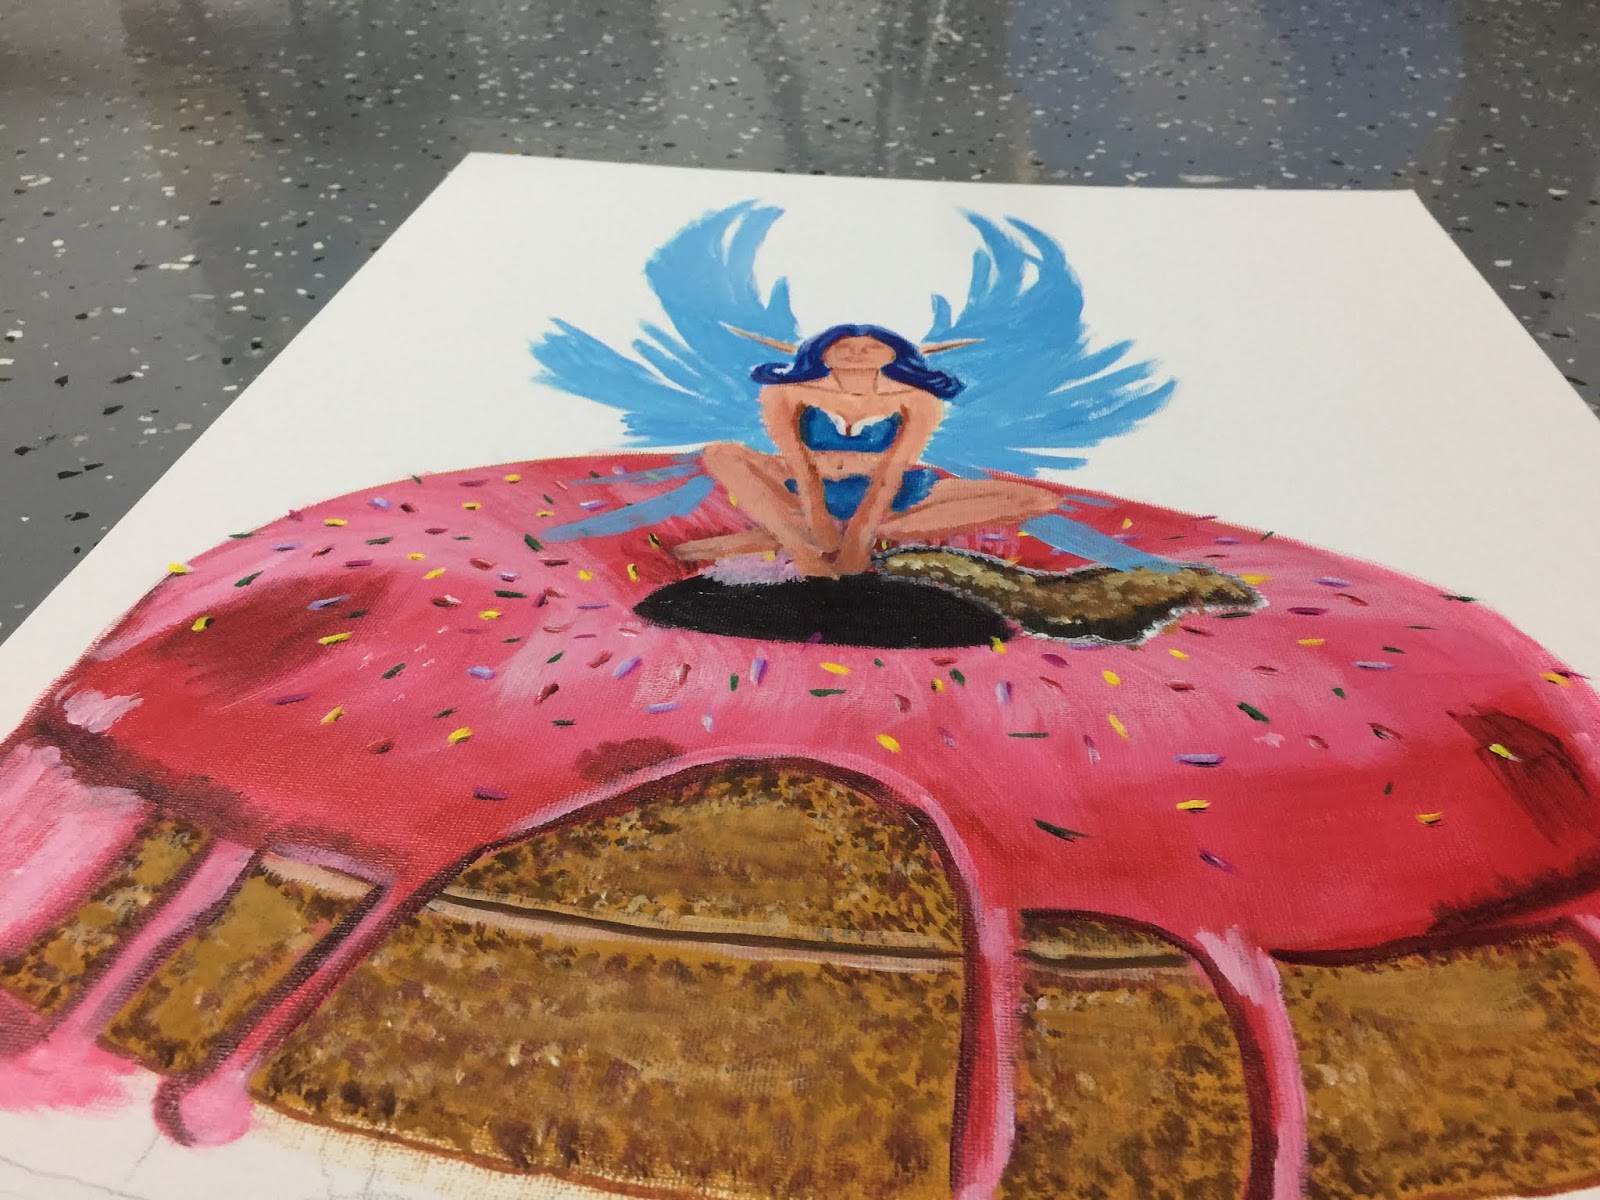
Almost at the end, painting her wings.
Using brilliant blue paint along the wings that you have traced on. Do
a couple of coats of blue, adding some darker tints to the parts
closest to her body.

Then
add rich gold to the top parts of the wings, and while the gold is wet,
sprinkle gold glitter on the wet paint. Do this for both wings.

Go
over any part you think needs extra highlights, like her hair or parts
of her face. Add more glitter to the back ground, do whatever takes
your fancy. This is your painting, make it yours and enjoy the process
of creating.


Until next time.........

