Pages

Showing posts with label acrylic painting. Show all posts

Friday, 7 June 2019

Learning how to paint what people want and keep myself happy at the same time.

 How Do I Keep Myself Happy and Gain More YouTube Subscribers?


Good Morning, it is a wet Saturday morning here in Australia.  I am still in my pajamas and it is almost 12pm, oops. 
I have recently uploaded my latest YouTube video, but I do have reservations about it.  Here is a pic of the finished painting.  There is a gold bokeh background and lady with blonde hair and a red dress, with some punched butterflies flying away.  I don't mean I punched the butterflies lol, I used a punch and some card to stick them to the dress.  I like her, but she is not my usual style.  Here is the link if you wish to paint her:  https://www.youtube.com/watch?v=sO-zVKNhJIM


You see I love to paint complex and perfectionist paintings.  I love to have many many layers, and lots of thinking when it comes to painting.

I have been trying my best to get my YouTube subs up, now it is hard.  I paint something I love and I do a tutorial for it and I get excited, only to be disappointed in the amount of views.  Am I not doing the tags right?  Are the paintings too complex?  Do I just completely suck? Am I the problem?  I know when I get into a painting I go quiet, and since I am the only one in the room with the camera it can get a little quiet on the video. 

So I am having a crisis of faith, or I am lost, or maybe I have never had a clue.  Why am I doing YouTube?  Why have I always wanted to do it?  It's not like I am going to make any money from it.  If anyone has an answer I would love to know lol.

I would love to be able to get my subs up to 1000 over the next year, but it is such a huge mountain to climb.  I have never liked myself so why would other people want to listen to me?  It is so hard for a person like me with absolutely no confidence in myself to be able to do this kind of stuff.  I really want to succeed though, I am determined to do my best, and not listen to the voices in my head telling me to give up.  So I suppose the only solution is to keep trying, keep going, and maybe one day I will get that 1000 subscribers.  Until then I will keep uploading videos, easy and more difficult.  I love the difficult ones, I love showing people that anyone can paint them, but in hindsight they could be intimidating to the beginner.  So a happy medium needs to be agreed upon in my mind. 

I really like the way she turned out, she is a simple and quick painting, and hopefully she will be liked by viewers. So let me know what you think of her, and my other videos.

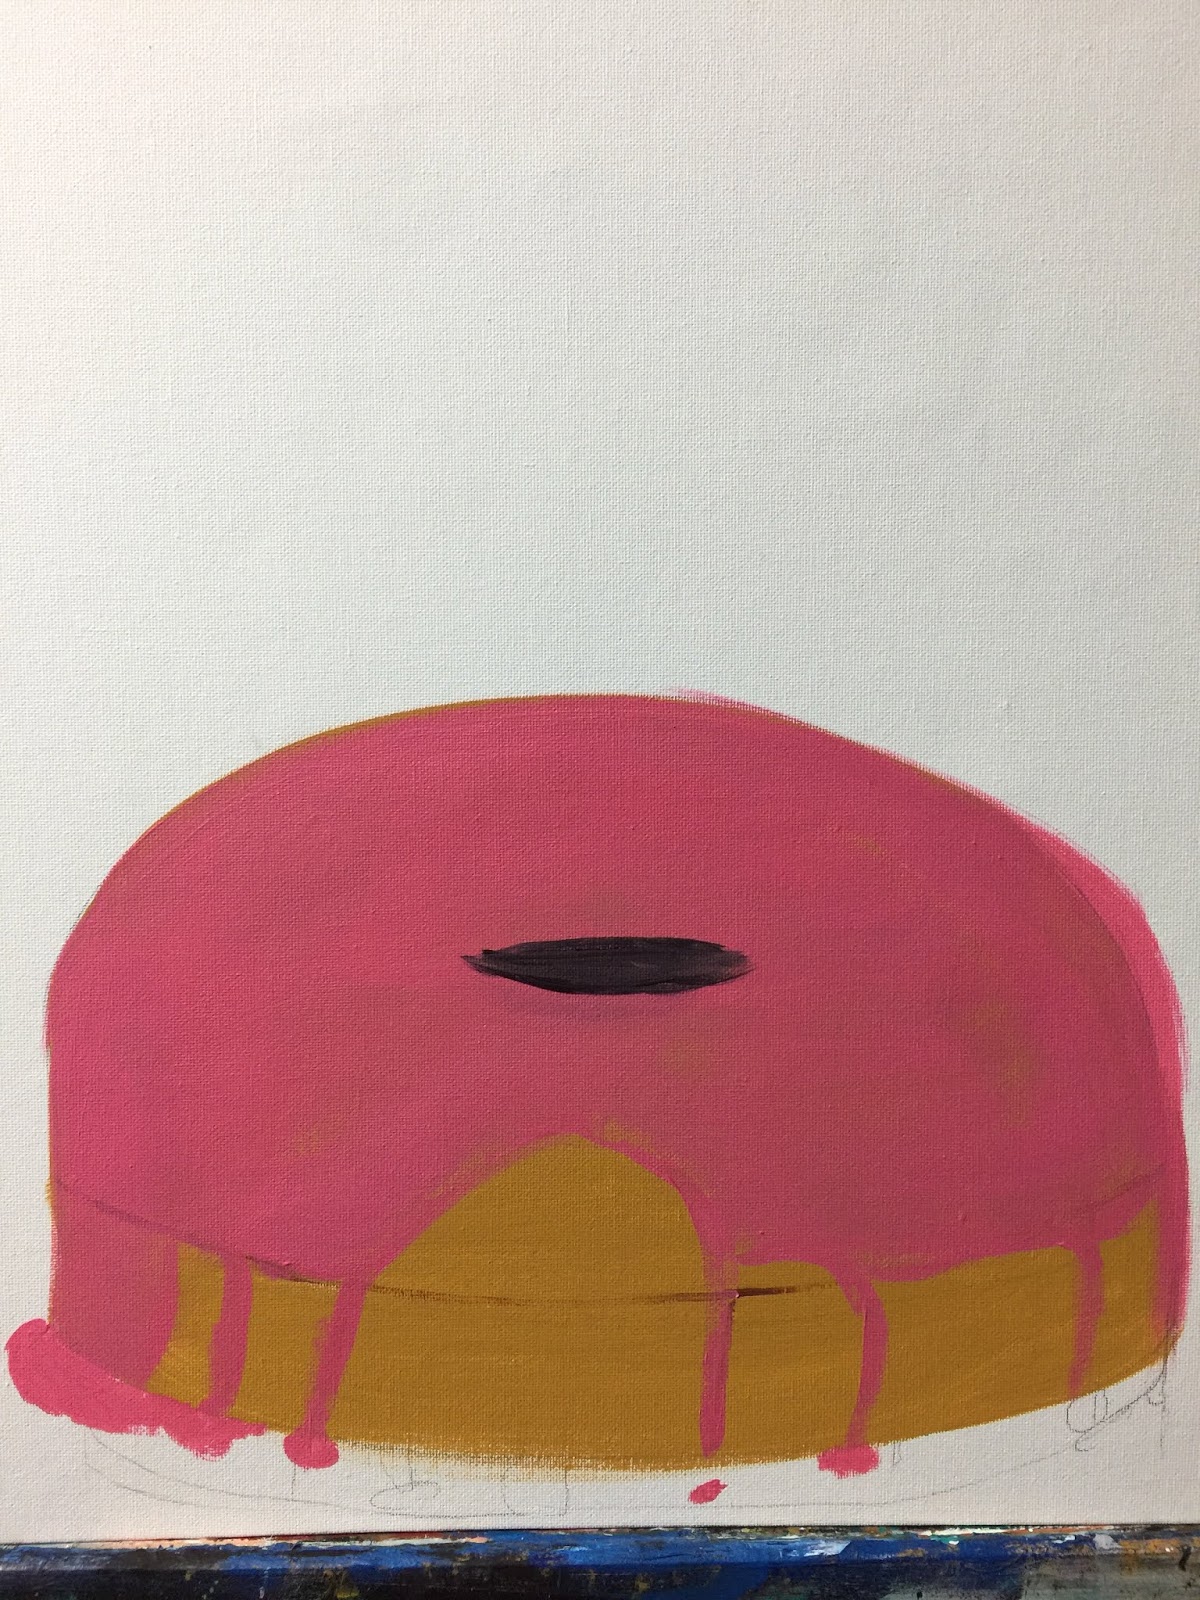
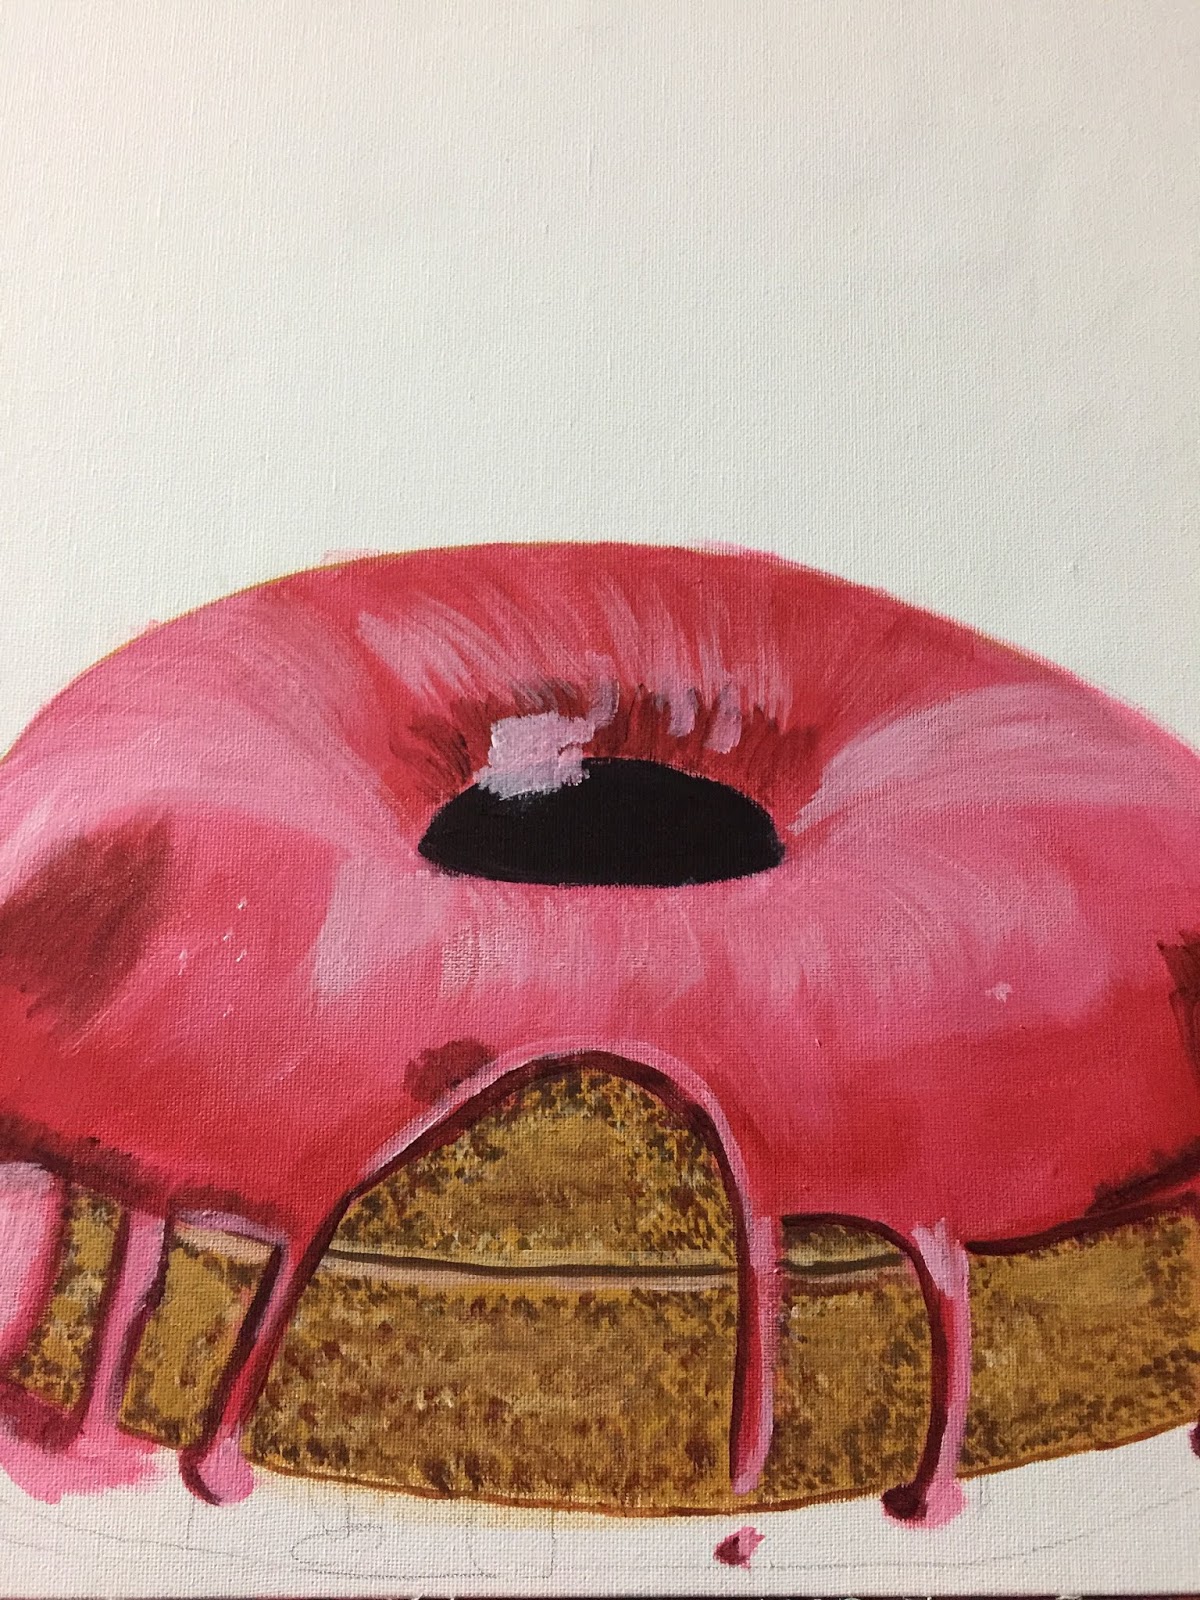
I have a finger painting video of Mario from Super Mario Bros coming up next Saturday, as part of the Aussie YouTube hop, which I really love taking part in!  Here is a sneak peak of the final product of Mario.


This is the bokeh background to the lady in red painting.  If you wish to just paint the bokeh then just follow the beginning of my YouTube tutorial.


Just as a little sneak peak, I will show you the Pixabay photos that have inspired me for my next YouTube painting tutorial.  These are all off the Pixabay website.  https://pixabay.com/


So as you can see, flowers and baskets are the common theme here.  I have not designed the painting yet, but it will be a basket of flowers, somewhere, somehow lol.  I cannot wait to show you what I come up with.

So for now I will bid you adieu.  Have a wonderful week, look after yourselves and don't forget to art.  Art as if your life depends on it, because for some people like me, it does.


Please follow me on facebook........... KristinaObrienart

I am also on Instagram.......... https://www.instagram.com/kristina_obrien_art/

Aaaand Pinterest....... https://www.pinterest.com.au/krystalrose316/pins/

And now Youtube.......https://www.youtube.com/channel/UCpgFuUdFo0dyREOhcSgXBrw


Friday, 5 April 2019

Acrylic Painting Tutorial of a cat, with a mental health ribbon, with a Ruby Rock-It Designs competition!!!

Acrylic Painting Tutorial of a cat, with a mental health ribbon.

As most of you should be aware I suffer from mental health issues daily.  I fight them daily, some days are better than others.  Some weeks can be a ride off, but I am still here ;


This is the cute little cat that I decided to share with YouTube and teach people how to paint.  I wanted to do something relatively easy to follow, and teach.  This teaching business is not easy.  I have never done it before, I am still learning to paint myself, and I will still be learning to paint until the day I die.  There is so much to learn and know.

I am not going to go through all of the details of this painting as it is on my YouTube channel as a complete tutorial.  So make sure you check it out here:  https://www.youtube.com/watch?v=pJh8Zt2TbPM

This is a picture of me starting to paint the cat, and the new YouTube video making set up I have.  Well, it's an old video camera I kind of forgot I had because it was so hard to get the videos off it.  I still have to mess around so much to get the videos off, then converted to the right format, then add them to iMovie but I really think my videos are getting better.

I have this damn inverter in my garage that makes so much noise it's ridiculous.  I didn't realise how noisy it was until I listened to one of my videos.  When I am painting I kind of go into my head, and I don't hear much going on.  It's my happy place.


 This is my naked kitty cat lol.  Like I said before he is one of the easier paintings I have done.  I wanted it to be nice and easy so people would be more likely to do it.  I just want people to paint, enjoy art and love themselves.

I recently had a hard week, or a hard few weeks.  Some things happened that I am not going to breath life into again, but they drained me.  I began to obsess and get super depressed over everything going on.  I lost a long time school friend, but things that were said were not nice.  Yep, I gave in too an added some things I regret saying, but what she said was unforgivable.  So after a couple of weeks of not talking, during this time I was so upset about it all, I felt so awful for blocking her, I just wanted to be friends again, my body and my mind just kind of gave up this week.  I was at my sons swimming lessons and I just needed to sleep.  I began to have a panic attack because I was so tired and I didn't know what to do.  I couldn't fall asleep in the building, that would draw attention.  So I decided I had to go sit in the car and wait.  I fell asleep in the car, like a deep sleep but I could still hear things going on.  I was worried about not being able to wake up while I was asleep.  How can I drive home if I can't wake up?

Luckily I managed to wake up just as my son finished.  I drove home and went back to sleep.  A deep deep sleep.  I think it was my body and my mind saying time to shut down and just let go.  After that sleep I haven't been as upset about losing my friend.

It is amazing how mental stress can affect my body.  So I just want everyone to realise that it is ok not to be ok.  It is ok to ask for help.  It's ok to get frustrated, I do, to the point of wanting Electric Shock to get rid of my depression.  Just listen to your body, don't let it get to the point where your body just gives up for you.

You know what got me through this week?  I stopped my obsessing by putting my hand on my chest and counting the beats.  Then I thought, how many heart beats am I going to give to this "woman"?  How many of my limited heart beats does she deserve?  In all honesty none, but of course I am human so I gave her quite a few, but she is getting no more from me.  I am done with her.

So please look after yourself, forgive yourself, and keep your heart beats for the things, times and people that matter.


Please follow me on facebook........... KristinaObrienart

I am also on Instagram.......... https://www.instagram.com/kristina_obrien_art/

Aaaand Pinterest....... https://www.pinterest.com.au/krystalrose316/pins/

And now Youtube.......https://www.youtube.com/channel/UCpgFuUdFo0dyREOhcSgXBrw


Monday, 18 March 2019

Chocolate Easter Bunny acrylic painting tutorial, two bunnies hugging in a field painting tutorial

Chocolate Easter Bunny Painting


Paints required:


Jo Sonjas Sap Green
Jo Sonjas Carbon Black
Burnt Umber
Burnt Sienna
Titanium White
Napthol Crimson
Cobalt Green
Hookers Green
Primary Yellow
Silver
Copper
12 x 16 Canvas board
Filbert paint brush size 4
Flat brush large enough to paint the background easily
Old stuff round brush for the white flowers
Old brush for scumbling
Rigger brush
Golden Glazing Liquid


Steps to painting some chocolate bunnies!

1.
The first step is to get excited.....it's almost Easter, Easter means chocolate!  Then grab your sap green and paint the whole canvas.  Let it dry and paint another layer of sap green. 


This is the point where you look at the reference photo I have provided.  It is royalty free and downloaded from Pixabay so you can do what you like with your painting of it :)  See the different shades of green in the picture, that is what you are focusing on.  Get your Hookers Green and your favourite scumbling brush (scumbling does ruin a paintbrush so use an old one or one you don't care much about) and start scumbling parts of dark green in the background, following the picture below. 


  To scumble, you place the tip of the paintbrush on the canvas and lightly go in circles.  To blend the Hookers green into the sap green you just scumble some sap green around the hookers green.  I have made a YouTube video for this painting.  I will add the link at the end of this blog.  Just keep scumbling lighter and darker green around the canvas until you are happy.  You should end up with something similar to this picture.


Now for the longer blades of grass behind the bunnies.  Using your rigger brush, and cobalt green, dip the brush in water and then mix it into the paint.  You want it watery, but not too watery.  About a third of the way up the canvas begin making long blades of grass, using sap green, cobalt green and a mixture of these greens together.  Fill the whole bottom third of the canvas with grass blades.


Using Titanium white, dip your old stiff brush into the paint and just lightly dab on some white flowers. 


2.

Tracing in the chocolate bunnies:

Trace the chocolate bunnies in using your preferred method, or draw them in if you enjoy drawing (traceable will be at the bottom of the page and also on my Pinterest page.)


Paint over the whole bunnies in Burnt Sienna, leaving the eyes blank so you know where they will be.
Then paint a layer of Burnt Umber on Daddy Bunny.  Work on one bunny at a time, it makes things easier since they are so close to each other and the same colour.


Using Burnt Umber and a small amount of Titanium White mixed together paint the inside of Dad Bunny's ear.  Using Black paint in his nose and the little gap on his face that makes his nose. 


Dry brush Burnt Umber and Titanuim white combined on Dad's belly, the inside of his ears, his head and his arm.  Paint white where his eye will go.  Mix Napthol Crimson with a little white to make pink, and paint that inside his ear.  Then using Burnt Umber make small lines on the edge of his ears, these are the imperfections in the chocolate.  Make sure you follow the direction of his ear when doing these strokes, look at the reference picture you will see they all go in different angles.  Mix a little Burnt Umber and Titanium White and outline the dark creases you just did.


Add some Burnt Umber and Titanium White to the inside of baby bunny's ear so you know where it should be placed.  Finally for Dad bunny, using Black place a curved line where his closed eye is.

3.  The Chocolate cracks..

Make lots of small little marks on the Dad's face, and ears, looking at the reference picture to get an idea of the direction they should be going.  The mix Burnt Umber with Titanium white and make lines around all of the Burnt Umber spots and lines. He should begin looking like the picture above.  I have a quick time lapse showing how I did this.

Continue painting the choclate cracks all over his body.


4.  Painting Baby Bunny:

Using Burnt Umber and a little bit of Titanium White, cover the baby bunny in paint.  Add the pink mixture to the inside of his ear.  Use some Burnt Umber to outline where his arm and ears and head will end if you need to.  It does help.


Follow along the same procedure for making the cracks on baby bunny as you did on Dad bunny.


5.  More strands of grass

Using the rigger brush and a combination of the greens you used before, place some long strands of grass in front of the bunnies, this helps with pushing the bunnies back into the painting a little.  


Place some more white flowers around the front of the bunnies too.

Using Titanium white paint the eggs in, wherever you want them.  Using white first helps the colour you choose for the egg to be seen better.  Use Primary Yellow for one egg, and Napthol Crimson for the other.  Let it dry then do another coat.  

Use Hookers green to paint the shadow of the eggs on the grass.
Mix the yellow with some burnt Umber to create the shadow on the yellow egg.  Mainly on the bottom of the egg and the sides.  Mix Yellow and Titanium White to create the highlight on the top of the yellow egg.  
Mix black with red to create the shadows on the red egg, and mix red with zinc white to create the highlight on the red egg.  You can use Titanium White, just be careful not to turn the red pink.  Zinc White is less strong and it takes a bit more of it to turn the red pink, henceforth making it perfect for highlights.


Decorate the eggs however you want, making sure if you want lines on them they need to be curved to make the egg appear rounded.

Using the rigger brush, add some grass strands in front of the eggs, like you did for the bunnies, and then some white flowers.

Don't forget to sign it......


My Pinterest page where the reference photo and the traceable can be downloaded:  https://www.pinterest.com.au/krystalrose316/art-with-an-aussie-youtube-traceables/

My Facebook Art Page:  https://www.facebook.com/KristinaObrienart/

I will have the YouTube video up for this tutorial by the end of today, so make sure you check it out:
https://www.youtube.com/watch?v=OuMpBZtWkaA

That is it for me this month.  Hope you enjoy painting this sweet little Easter scene.

Lots of Art hugs......


Tuesday, 26 February 2019

Blue Fairy on a Pink Donut Fantasy Acrylic Painting Tutorial

 Blue Fairy on a Pink Donut Fantasy Acrylic Painting Tutorial


Glamour Shots


Hey there everyone, Kristina here with another blog post on  acrylic painting.  I decided a fantasy painting would be perfect for this month's tutorial.  I really hope you enjoy painting this as much as I did.

If you are in Hervey Bay, make sure you make time to visit Art and Soul Studio, shop 2/168 Boatharbour Drive, Pialba. 
You can even shop online https://artandsoulstudio.com.au/.

Acrylic paints used in this tutorial:

These colours and more are available at the Art and Soul Studio Hervey Bay.  I mainly use Golden paints and Liquitex heavy body.  Jo Sonja has a gorgeous rich gold that I use.

Mars Black
Rich Gold 
Quinacridone Red
Brilliant Blue
Titanium White
Lavender
Primary Yellow
Primary Blue
Permanent Green Light
Dioxaxine Purple
Brilliant Magenta
Transparent Red Oxide
Burnt Sienna
Flesh Tint
Alizarine Crimson
Yellow Ochre 
Burnt Umber

Paint Brushes Used:

Large Flat Brush
16/0 detailer brush
Size 4 Round brush
Dagger Striper

I used a 16 x 20 inch canvas board. 
Gold Glitter for the fairy wings
Golden Super Gloss Varnish

Let's begin the fun!

First step is usually to paint the back ground, this makes things a lot easier and saves you a lot of time.  So if you know what colour you want the background to be then do it now.  I wasn't sure what colour I wanted until the very end.  I chose Mars Black.  So paint the whole canvas Mars Black.

Wait for the paint to dry and sketch the shape of the donut onto the canvas.  Then paint the whole donut Yellow Ochre.  

Mix some quinadicridone red and titanium white to make the pink colour of the icing. This colour pink is perfect.


Paint over the sections marked for the icing with the pink paint. Use Mars Black to paint in the hole of the donut.

Don't worry, a few more layers and this donut will look scrumptious.

To make the texture of the dough, using a round brush just dab dots all over the yellow ochre part of the donut, using a combination of burnt sienna, yellow ochre and burnt umber mixed, burnt umber, yellow ochre and white mixed.  Cover the whole area in lots of dots, keeping the bottom of the donut darker, and the parts directly under the icing darker as well.

Using burnt umber and the round brush, draw a curved line approximately half way down the donut, to form the crease.  Add some titanium white to the burnt umber and draw a lighter line on the top and bottom of the burnt umber line to indicate highlights.


Painting the icing:

Adding shadows and highlights to the icing makes it look more realisitic, so let's get to it.

Using a 3:1 ratio of Quin red and Titanium White, make a darker pink to begin the shadows along the back edge of the donut.  Use the flat brush to curve your stroke up from the donut hole, in a curved motion forming a backwards "C".


Now for the darker highlights, just use Quin red, and a small amount of the Green Light (being opposite on the colour wheel the green will darken the red perfectly).  


Shade the donut as shown above, then using the round brush and the same colour paint a line at the bottom edge of the pink icing and the edges of the icing drips.

For the highlights use the quin red and titanium white mixture, adding more white to make it nice and light.


When painting the top of the donut, make sure you do a curved motion to make the top of the donut appear curved.  Using the light mixture of the pink and white, add the highlights as shown above.  Making sure each stroke is curved in the way you want the donut to look.

Add highlights to the icing drips as well.


Painting the sprinkles:

This is quite easy, just get the colours for the sprinkles....Primary yellow, titanium white, lavender, green light and quin red.  Paint a little line where ever you want the sprinkles, in all different directions.  To ensure nice coverage of the yellow, paint the lines white first, then wait until it is dry and paint the yellow over the top.  

Add darker colours to the bottom of each sprinkle for the shadow, and a touch of white on the top for a highlight.  This adds depth to the sprinkles.


 The donut should be looking like this, nice and edible.

Painting the fairy:


This is the traceable for the fairy, this image was downloaded off Pixabay and is free to use.  Just don't draw in the mushroom as she is sitting on the donut.  Trace the fairy into position on the top of the donut.  I used pencil so you can see it.  It is best to use chalk, watercolour pencil or transfer paper.


Using flesh tint, do a first layer on all of her skin parts, head, chest, arms and legs.


 Use the brilliant blue to paint in the fairy clothes.


Mix transparent red oxide and yellow ochre 50/50 mix.  Add a touch of Alizarin Crimson and then mix titanium white into this mixture.  You should have a darker skin tone to paint in the creases and the shadows.  Use this darker mixture to paint in the lines on her chest, under her neck, her collar bone and the outside of her legs and arms.  Where all the creases will be.


While the darker colour is still wet, use the flesh tone to blend the darker tone into the lighter tone.


The face on this fairy is very simple.  Using the darker flesh tone, paint in the outlines of the mouth, eyes and the sides of the nose.  See how hinting at the lines on the face actually makes a face appear.  It is a very simple and easy face to paint.  Paint in the hair using Primary Blue, following the direction of the hair.  High light the inner part of her breast with a lighter flesh tone.


To make the fairy a little naughty, by having bites taken out of the donut is fun and quirky. Using yellow Ochre and the round brush dab along where you want the missing piece.

Add some burnt umber and burnt sienna dabs to this bite too. 


Dab mars black around the edge of the bite, and then highlight this with titanium white.  Make sure the top half of the donut is darker, to hint at the shadow.

Almost at the end, painting her wings.  Using brilliant blue paint along the wings that you have traced on.  Do a couple of coats of blue, adding some darker tints to the parts closest to her body.

Then add rich gold to the top parts of the wings, and while the gold is wet, sprinkle gold glitter on the wet paint.  Do this for both wings.


Go over any part you think needs extra highlights, like her hair or parts of her face.  Add more glitter to the back ground, do whatever takes your fancy.  This is your painting, make it yours and enjoy the process of creating. 


Until next time.........