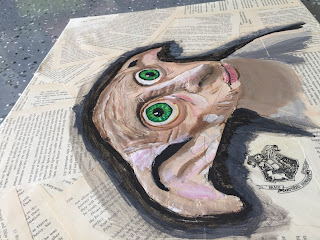
Not the most gorgeous face ever, but definitely one that I fell in love with. Dobby, the elf from the Harry Potter series. I actually came up with him because I was applying to be on a design team, whose main focus is adhesives. An Australian company called Helmar. I saw their design team call and knew that I wanted to be a part of the team. It only just closed so at the time of typing this I have no idea if I am. Maybe, maybe not. At least I tried, and for that I am really happy.
I use adhesives in absolutely everything that I do, but they aren't the main focus, just an important element. So I set myself a challenge to make glue the hero. I think I did quite well.
I had a completely ruined Harry Potter book, so I ripped 😮 out some good pages that I could find, and I covered the whole canvas in glue.
I then added all the pages to the canvas, in a variety of directions. Ensuring that the edges of the canvas were covered too.
Now came the hard bit. Once it was dry I had to get the outline of Dobby onto the pages. I used an 8b pencil and it did a great job. To get the outline I found a picture online of Dobby that I liked, then I printed it out at the appropriate size for the canvas, and I traced it onto the canvas.
I then went over the edges in a raw umber outline, just to ensure that I didn't lose the lines while I was making the paper mache part.
Using glue I slowly layered up Dobby's nose and forehead, as they are the most prominent on him. I ripped paper into small bits, glued them onto Dobby, making sure they didn't go over the outline. I thoroughly covered each piece of paper in glue, before and after putting it onto the canvas. I was honestly flying by the seat of my pants here. I had no idea where I was going with this, and I was scared of how it was looking. I persevered. I am glad I did.
I kept building up his nose and his forehead, and then began to build up the tip of his ear and his lips. I didn't want them too big, just enough to make the canvas seem lifelike. I kept ripping and gluing until I was happy with the height. The tip of the nose has to be higher and more rounded than the rest of the nose and forehead.
Kind of looking a little worrying at this stage, hehe. I covered his face in unbleached titanium, and I wanted to make his lips and the end of his nose a little pink, so I added a speck of Alizarin Crimson to the unbleached titanium.
Ahhhh, beginning to look a little better, thank gosh. I just kept building up the layers of unbleached titanium and the crimson at this point. I wasn't worrying about the details of his wrinkles or lips. I just wanted to get some paint on him to see how he was going to turn out.
I just kept my eye on the picture of Dobby that I printed and I worked from that. His eyes are a mixture of sap green, light green and cadmium yellow. His eyes seem to radiate in his pictures so I tried to capture that glow. His whole face was differing mixtures of unbleached titanium, alizarin crimson and raw umber. I then used Titanium White for the high lights and reflections.
I am really proud of how he turned out. I loved the opportunity to dabble in mixed media. Hopefully I continue to do more of these types of projects.
The glue I used was Dina Wakley ultra thick gel medium. I purchased this product a while ago from my favourite art shop here in Hervey Bay, Art & Soul Studio. It was less than $12 and went a long way.
https://artandsoulstudio.com.au/
I am yet to varnish it, but when I do it will be Liquitex Gloss Varnish in a super large bottle that I love oh so much. I am going to try the Super Glossy Varnish from Liquitex next. I just love the finish it gives.
That is my glue inspired project I did on a whim. Take a chance I say. Follow your instincts, try it. There's no real failures, just lessons learnt.
On to my next piece, a miniature polymer clay Jack o lantern that I put on top of a battery tea candle light. I love it. It took me a few attempts, as usual, to get it the way I like it and to figure out the best way to do it.
This is the next YouTube Tutorial, it will be up in a day or two. The month of September is dedicated to Halloween!! So bring on all the spooky and scary things.
So happy with the way the jack o lantern turned out. I saw the battery tea lights and I thought yep, I need to do it.
Here is the link for my Youtube Channel.......MY YOUTUBE CHANNEL!!
Please like, comment and subscribe!
Please follow me on facebook........... KristinaObrienart
I am also on Instagram.......... https://www.instagram.com/kristina_obrien_art/
Aaaand Pinterest....... https://www.pinterest.com.au/krystalrose316/pins/
And now on Etsy......... https://www.etsy.com/au/shop/KrystalRoseCreations?ref=seller-platform-mcnav
And now Youtube.......https://www.youtube.com/channel/UCpgFuUdFo0dyREOhcSgXBrw
Until next time.........


No comments:
Post a Comment